
QUIC.cloud is also a product of LiteSpeed Technologies. QUIC.cloud is the only content delivery network (CDN) which caches the dynamic pages of WordPress sites. It is said to be the only complete CDN for WordPress with full-page caching abilities. QUIC.cloud is used to make your websites fast and secure.
A free version of QUIC.cloud has recently been released. This free version has many features and solutions. All of these will be discussed later in this post.
In this article, we will check what is QUIC.cloud, Why to use it, How to set up QUIC.cloud for your WordPress site, and also we will check and state the details of the recently released free version.
Table of Contents
What is QUIC.cloud?
QUIC.cloud is a CDN service by LiteSpeedTech. With QUIC.cloud, you can cache dynamic WordPress pages. You can also speed up and secure your website with QUIC.cloud.
With QUIC.cloud, user experience and ranking will increase because all pages, including dynamic ones, are cached. The nearest QUIC.cloud server will serve any page someone requests from your website so your website will load quickly and easily.
Why QUIC.cloud?
It is the only full-page cache CDN for WordPress with an intelligent purge that keeps up with the QUIC.cloud network and effectively updates edge servers so that users don’t have to receive outdated information.
With this in place, your website will run faster and more securely, leaving users able to access it at a faster speed through the world rather than sending a response from your main server which is located only in one location.
In addition to speeding up your site, QUIC.cloud will also leave a positive impression on your visitors. Therefore, all of these things will improve your website’s rank and user interaction.
Prerequisites:
Before going to set up QUIC.cloud you must have these things ready as you will need these throughout the setup.
- A WordPress Site (you can deploy a WordPress site using our guide)
- QUIC.cloud account
- LSCache plugin installed on your WordPress site.
Setup WordPress with LSCache:
If you already have a WordPress site with LSCache installed you can skip this step, otherwise, CloudPages allows you to deploy your website with LSCache plugin preinstalled.
To keep this article short and simple you can visit this link to deploy the WordPress site with LSCache using CloudPages.
Setup QUIC.cloud
As soon as the WordPress site is complete, and all the setup is done, it’s now time to link QUIC.cloud account to WordPress.
Link QUIC.cloud to WordPress:
For setting up QUIC.cloud in WordPress, the first step is to go to the WordPress dashboard.
Request a Domain Key:
Navigate to the LiteSpeed Cache section of your WordPress admin dashboard and select General. On the General Settings tab below the Domain Key text field, click the Request Domain Key button.

Upon completing the above step, you will receive a notification that your request has been made, please wait for the results.
Domain key is there when you refresh the page and the value of the generated key is updated in the text field and finally you can see that Link to QUIC.cloud button has been enabled.

Link to QUIC.cloud:
The previous step must be completed in order for WordPress and QUIC.cloud to work together. Click on the button Link to QUIC.cloud. You will be redirected to the QUIC.cloud signup page after clicking on this button.

Now if you already have your account with QUIC.cloud, you just have to provide your credentials and you can log in. If you don’t have an account then create a new account, you can easily create a new account using Google, Facebook, or Twitter.

Visit My Dashboard on the QUIC.cloud button verifies that your site is linked to your QUIC.cloud account.
Now, Your WordPress site is linked to QUIC.cloud account and you can use most of its features like image optimizations and critical CSS generation but CDN and full-page caching is still not in use. To set up CDN, we will have to make some DNS changes.

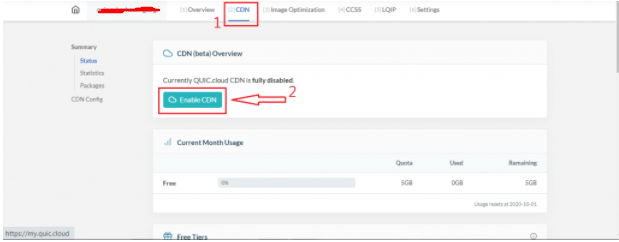
Enable QUIC.cloud CDN:
QUIC.cloud is now connected to your WordPress site, but the CDN is not yet being used. QUIC.cloud will provide a CNAME that will allow you to enable CDN usage.
Enable CDN and get CNAME Record
- Go to your QUIC.cloud account settings and select the website you would like to enable CDN for.
- Select the CDN tab and click on the Enable CDN button
You will be provided with the CNAME records for the website that is enabled by QUIC.cloud. If you wish to use full CDN services, you must point your website to this CNAME.
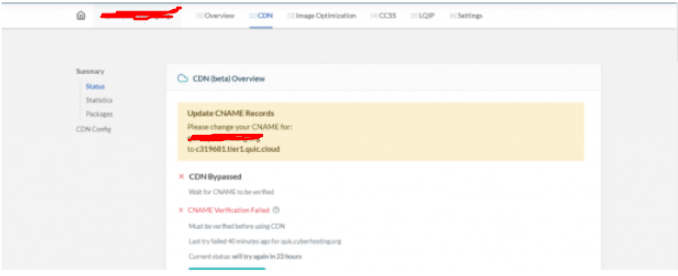
Update DNS
Now to enable the CDN effect on your site, head over to your domain DNS settings and make sure your domain points to the CNAME provided by QUIC.cloud as shown in the above image.
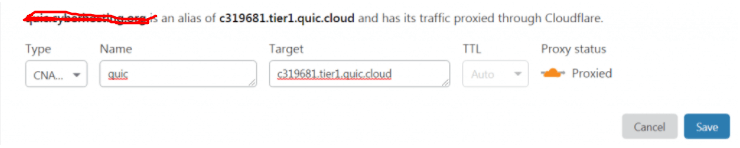
and that is it! Your website is now using QUIC.cloud Content Delivery Network ( CDN ) with full-page caching enabled.
Verify If CDN is Enabled
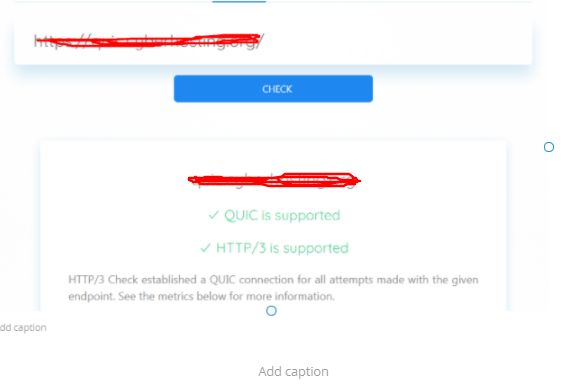
Still curious, If your site is using the CDN or not? Well, there is a way to verify whether your site is being served through QUIC.cloud or not.
You can use HTTP/3 Check to verify it. If your site is using the QUIC.cloud CDN and it is working properly, you will see something like this as shown in the image below.
Enjoy Boosted site by QUIC.cloud!
QUIC.Cloud CDN Free Plan:
On September 15, 2021, Lisa Clarke published an article on Quic.Cloud official website. In that QUIC.cloud announced a free version of QUIC.cloud CDN.
This Free CDN plan offers unlimited bandwidth in North America and Europe using a network of selected PoPs. Although the standard plans of QUIC.cloud are still available with a lot of extra features like DDOS attacks protection and all. But this new free plan is 100% free and easy to get without any hassle.
Here is a comparison table between the new free plan and the old standard plan.
| Feature | Free Plan | Standard Plan |
| CDN Nodes | North America and Europe | Available Globally |
| Security | Basic | Configurable with DDOS protection |
| BandWidth | Unlimited | Depend upon the plan |
| Analytics | Recently Only | Full Year |
| Cost | Free | Varies According to Bandwidth |
Although some feature is not in the free plan but this free plan has unlimited bandwidth which is a great plus.
Some people may get confused with the free credits and free plan so free credits are not the free plan even paid and free both plan users will get free credits every month and that didn’t affect the plan anyway.
Some people may get confused with the free credits and free plan. Therefore, free credits is not equal to the free plan. Even users of paid and free plans both receive free credits every month.