
Since you have landed here, you are looking for LSCache vs WP Rocket comparison. Short answer: LSCache wins in most cases. In this article we will dig deep and compare different features of both of these plugins and also show you GTMetrix results and live tests from loader.io.
In addition, we have written a detailed comparison of openlitespeed vs nginx using live tests. OpenLiteSpeed is an opensource version of commercial LiteSpeed webserver and the good news is that you can use LSCache plugin with OpenLiteSpeed as well.
Back in the days when you had to use LSCache plugin you had to look for a host that offers LiteSpeed hosting, but now you can use a cloud control panel like CloudPages to deploy a WordPress site on OpenLiteSpeed and make full use of LSCache plugin.
Table of Contents
Why Picking the Right Cache Plugin Is So Important?
A fast-loading website is vital for a high conversion rate and search engine rankings.
It is however not easy to optimize your website for speed, but, choosing the right cache plugin can make your life much easier. Below are few reasons to speed up your website:
- The likelihood of someone leaving your website before it even loads increases by more than 120 percent if your page takes 10 seconds to load.
- One second of delay in page response can lead to a 20% drop in conversions.
- The faster your site loads, the better it will rank on Google .
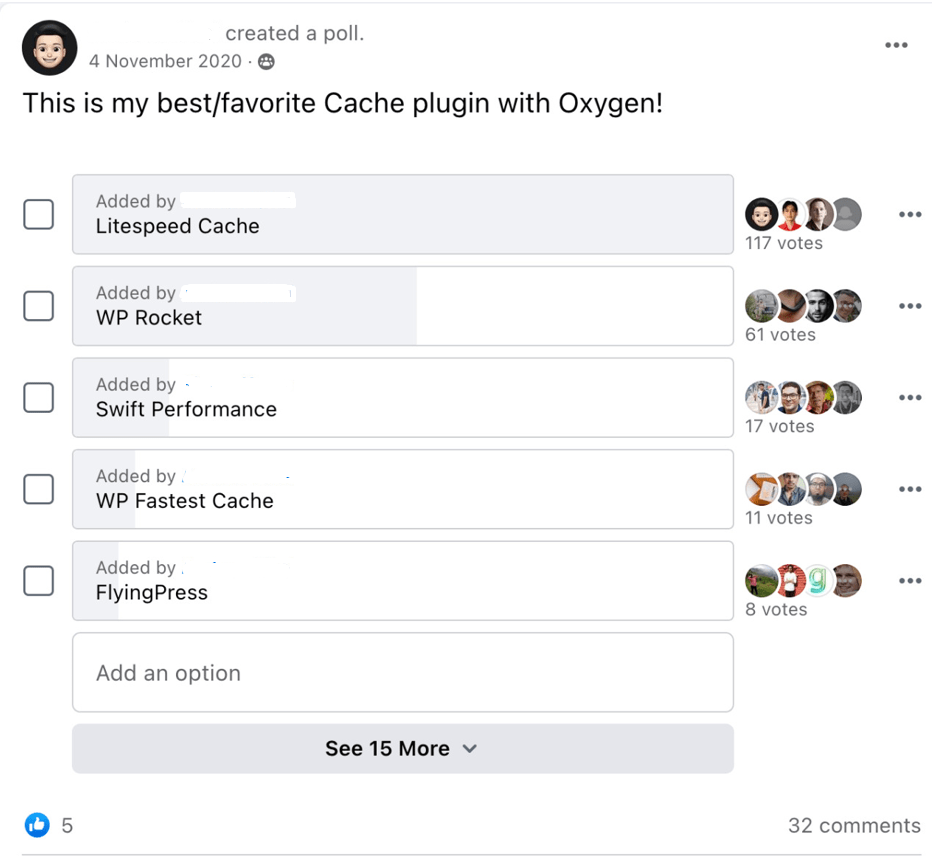
LSCache vs WP Rocket In Facebook Communities
Social proof is always the best way to determine how good a certain thing is. There are various polls created by people in Facebook Groups where LiteSpeed Cache plugin is appearing on top and getting all the love from people.
LSCache also have a rating of 4.8 on WordPress plugins directory with 1,912 reviews in total.
LiteSpeed Cache vs WP Rocket Similar Features:
Although LiteSpeed Cache and WP Rocket are two different plugins from two different companies and a variety of different developers but they both are trying to achieve same results. Since both of these are cache plugins, let’s talk about similar features first.
- Both WP Rocket and LiteSpeed cache provides full pages caching.
- Caching process is almost same.
- Purge process is same.
Caching:
Both plugins are able to do full-page caching. Rather than waiting for WordPress and PHP to assemble the pages with every request, a page cache can provide the snapshots much faster.
Caching with WP Rocket:

Like all cache plugins, WP Rocket also uses .htaccess rewrite rules to tell the server where the cached content is present. WP Rocket puts pages into the file system for caching, then removes them from there for purging (purging can be triggered by various methods one of which is TTL expired). That way, caching and purging work together. In this case, it examines the cache file system to see if the page exists. If it does not, then it is not cached. It can also tell if a cached page has expired by comparing the file time with the TTL.
Caching with LiteSpeed:
LiteSpeed Cache and WP Rocket cache content in a similar way but their main difference is the server-level caching module. LSCache is not doing the caching but rather the caching is handled by LiteSpeed web server cache module. Litespeed cache can be seen as a bridge between the user and caching module. It only gives an easy way for the webserver to perform functions such as adding and removing files from the cache.
Cost:
The big difference between LSCache and WP Rocket is the pricing.
WP Rocket is a totally paid plugin its price start from $49/year. They only provide you with 14 days money-back guarantee and you can check the pricing.

On the other hand, LSCache is a totally free plugin. You can install it on your site and use it without paying anything. But for the server-level cache, you must have a LiteSpeed Webserver on your host or you can use OpenLiteSpeed with CloudPages. You can get LiteSpeed Ent from here.
You can deploy both stacks on CloudPages (for LiteSpeed Enterprise, you can purchase license from LiteSpeed store)
eCommerce + ESI:
Some pages should not be cached for online shops and stores. For example, you do not want the cart and some widgets to be cached.
When you install WP Rocket on your online store, the cart and checkout pages are automatically not cached. They are dynamically generated and served without caching.
The LiteSpeed cache plugin comes up with a caching solution for eCommerce pages. With Edge Side Include (ESI), the pages are cached in LSCache. A hole is punched in public pages containing shopping cart data and other private content using ESI. The mixed-content page can then be fully cached and served to shoppers.
Ease of Use:
For Ease of Use: WP Rocket wins.
WP Rocket does not confuse users with lots of options to configure. However, LSCache plugin gives lots of options to users and newbies get overwhelmed.
As a developer you may enjoy LSCache more as it gives you freedom to configure everything.
LSCache vs WP Rocket: Features Comparison:
Now let’s talk about some features of LSCache and WPRocket and see which features are present in both or missing from both or one of them.
Cache Features:
Despite having many features in common, both plugins have some key differences. The following features were taken from the plugin’s official sites and guides and compared between the two. It is important to note that the LSCache only works with the LiteSpeed Webservers (OpenLiteSpeed or LiteSpeed Enterprise).
| Feature | LiteSpeed Cache | WP Rocket | |
| Full-Page Cache |  | | |
| Tag-Based “Smart Purge” | |  | |
| Tight Integration With Server | | | |
| Edge Side Includes (ESI) | | | |
| Crawler | | | |
| WordPress Multi-Site Support | | | |
| Cache Logged-in Users | | | |
| Cache Separate Mobile View | | | |
| Cache Vary on User Group | | | |
| Cache Vary on Geographic Location, Currency, etc | | | |
| Cache REST API | | | |
| Purge Selected URLs on a Schedule | | | |
| Browser Cache Support | | |
Tag-Based “Smart Purge” : Not many people are familiar with cache purge. With any cache solution intelligent purge is really important, otherwise your visitors might be getting outdated content.
LSCache wins in this department and that is why it is really loved by WordPress community. LSCache cache each page with tags and whenever any of those tags expires the whole page is taken out from cache and rebuilt and saved in cache engine.
Optimization Features:
The website owners continue to strive to make their website more and more optimized and optimization has always been a hurdle for them. Site speed is usually checked using speed testing sites. If you use the speed testing tool, they will also give you some feedback and suggestions for improving your website.
Both cache plugins provide options to optimize your website, we’ve listed the differences below:
| Feature | LiteSpeed Cache | WP Rocket |
| CDN Support | | |
| Database Optimization | | |
| CSS Minify | | |
| CSS Combine | | |
| CSS HTTP/2 Push | | |
| JavaScript Minify | | |
| JavaScript Combine | | |
| JavaScript HTTP/2 Push | | |
| Load CSS Asynchronously | | |
| Load JavaScript Deferred | | |
| HTML Minify | | |
| Exclude Selected URI’s from Optimization | | |
| Remove Query Strings | | |
| Remove Google Fonts | | |
| Lazy Load Images | | |
| Lazy Load iframes | | |
| Wildcard Usage in CDN Support | | |
Premium Provided Services:
LiteSpeed cache is always on top with a lot of free services. Although LSCache is free and WP Rocket is paid but LSCache has more extra features than WP Rocket.
- Critical CSS Generation: Both plugins have this feature
- Image Optimization: Only LSCache have this feature
- Responsive Lazy Load Placeholder Generation: Only LSCache have this.
Costs:
In terms of cost compression, LSCache took the top position again. It has a lot of features and it’s totally free. WP Rocket doesn’t have any free version and it also doesn’t have a free trial as well.
| Service | LiteSpeed Cache | WP Rocket |
| Plugin Cost | Totally Free | Starting from 49/year |
| Support Cost | Totally Free | Paid |
QUIC Cloud CDN Services by LSCache Plugin:
QUIC.Cloud CDN is an intelligent full-page caching CDN from LiteSpeed Technologies which runs on top of the LiteSpeed cache plugin in WordPress. It is the only CDN that can accurately cache dynamic pages, or pages which features content that quickly changes.
LiteSpeed cache for WordPress knows when it needs to automatically purge and sync data in the CDN, giving it the upper hand over other providers, like Bunny CDN and Cloudflare.
QUIC.Cloud also has some handy features, including
- Image optimization
- Critical CSS support
- LQIP or low quality image placeholder support
Another important thing about QUIC.Cloud is that its totally free to use.
QUIC.Cloud gives its users a certain amount of credit for each of their tiers of service. there are four service tiers.
- “Basic” which receives 10 credits
- “LiteSpeed server” which receives 50 credits
- “LiteSpeed Enterprise” which receives 100 credits
- “QUIC.Cloud partner” which receives 200 credits
For their CDN service specifically, each GB can “cost” you between 10 to 40 credits per GB of transfer for other services offered by QUIC, such as Image Optimization, there are other limits, which are similar to the way the CDN tiers work.
How does QUIC.Cloud compare to Cloudflare
Static vs Dynamic Caching
Cloudflare is an extremely popular CDN and DNS service provider, so popular that over 20 million websites are running the service. Their free CDN service focuses primarily on accelerating static resources such as images, CSS, JS, etc. and is platform agnostic, meaning it works with straight HTML, WordPress, Joomla, Drupal and other platforms.
QUIC.Cloud on the other hand is a new service from LiteSpeed Technologies which integrates directly into WordPress and accurately caches dynamic pages, or page which features content that quickly changes in your WordPress site.
Number of POPs
The biggest difference in terms of CDN in QUIC verses Cloudflare is the total number of available Points of Presence, PoPs. These are the individual data centers from where CDN providers can deliver content to visitors of sites using their services in those area of the world.
Because its relatively new, QUIC only have a little over 40 PoPs around the world, which is still very large for a new provider. But compare to Cloudflare on the other hand which has over 200 PoPs. Cloudflare has an unmatched advantage for faster delivery of static content anywhere in the world. However, keep in mind that Cloudflare doesn’t offer dynamic content caching for for free. For that you have to stop to their automatic platform optimization (APO) plan, which carries minimal monthly fee.
QUIC Cloud Full Page WordPress Caching
QUIC.Cloud only works with WordPress websites, at least for now and the only way to use QUIC.Cloud is from the LiteSped Cache for WordPress plugin. As you can surmise, this is a complete optimization solution for WordPress. From optimizing everything is WordPress using the LiteSpees Cache plugin, to delivering those optimized files using the QUIC CDN, LiteSpeed technologies have really built a tightly integrated platform.
Additional Services: CSS, JS Minification and optmizations
With QUIC.Cloud you get everything needed to optimize WordPress sites like modification, combination, image optimization, critical CSS generation, server push, a sync, defer and alot of other optimizations. This gives QUIC.Cloud an unmatched edge over Cloudflare that isn’t specifically optimized for WordPress sites but for every type of website as a whole.
Though Cloudflare does minification, image optimization and some other optimizations from their CDN, they are not tailored towards WordPress WordPress sites and so lacks lot of the features that are offered in QUIC.Cloud and LiteSpeed setup.
LSCache plugin and Cloudflare
You can, however use LiteSpeed Cache together with Cloudflare which will allow you to use all the optimizations offered by QUIC.Cloud with the CDN of CloudFlare. In short best of both worlds.
But if you choose this dual service method, you won’t get the seamless integration between WordPress and CDN that is provided by QUIC.Cloud and LiteSpeed Cache.
For instance, if LiteSpeed Cache purges its cache QUIC.Cloud CDN will also purge its cache.
LSCache + QUIC Cloud
In fact, almost all the settings of QUIC.Cloud are located inside the LiteSpeed Cache plugin and not in the QUIC.Cloud dashboard. So, you won’t ever need to worry about managing your WordPress and CDN separately which can’t be said for any other providers.
Though CloudFlare provides automatic cache purging, dynamic caching with cache bypass on cookies and some other features that try to make WordPress and CDN work together, the integration of QUIC.Cloud with LiteSpeed Cache is something totally different and should be called its own app ecosystem.
How to setup QUIC.Cloud CDN
There are some requisites for setting up QUIC.Cloud CDN
- You have control over domain’s DNS configuration
- You have installed and configured a WordPress site
- You have installed and configured the LiteSpeed Cache Plugin for WordPress
Before a domain can use QUIC.Cloud’s CDN, the DNS for that domain must be properly set up and working. So the first step to moving forward is to request a domain key.
Request a Domain Key:
To do so follow these instructions:
- Go to your WordPress dashboard
- Click on “LiteSpeed Cache” from the left hand side menu
- Select General

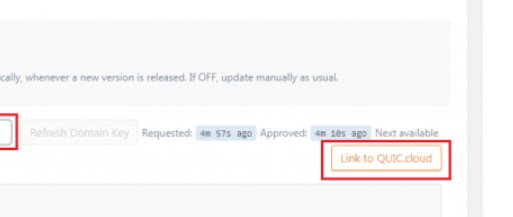
- Before you can pair your WordPress Website with QUIC.Cloud account, you need a domain key from QUIC to get this click on “Request Domain Key”
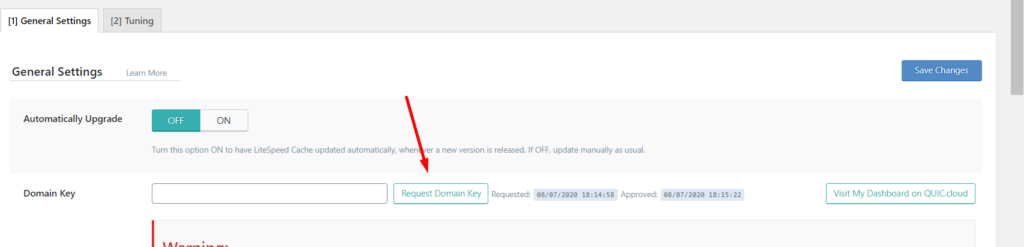
- Refresh the page and key is added
Link to QUIC.cloud:
- Next you need to associate your WordPress site with the QUIC.Cloud account. To do this click the “Link to QUIC.Cloud” button
- Create an account on QUIC.Cloud
- Go back to WordPress dashboard
- Click on LiteSpeed Cache -> CDN from left hand side menu. Enable “QUIC.Cloud CDN” option
- Save changes

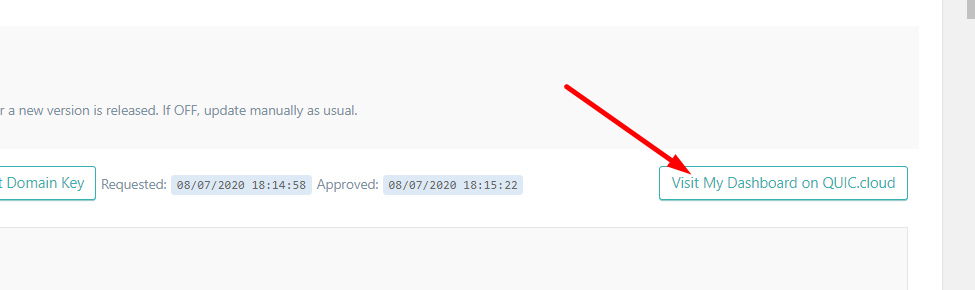
- Visit My Dashboard on QUIC.cloud button verifies that your site is linked to your QUIC.cloud account.
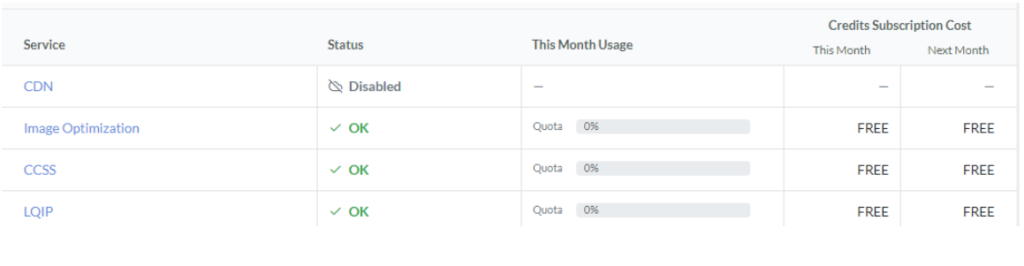
- Once you login you will be presented with all the links that you have connected
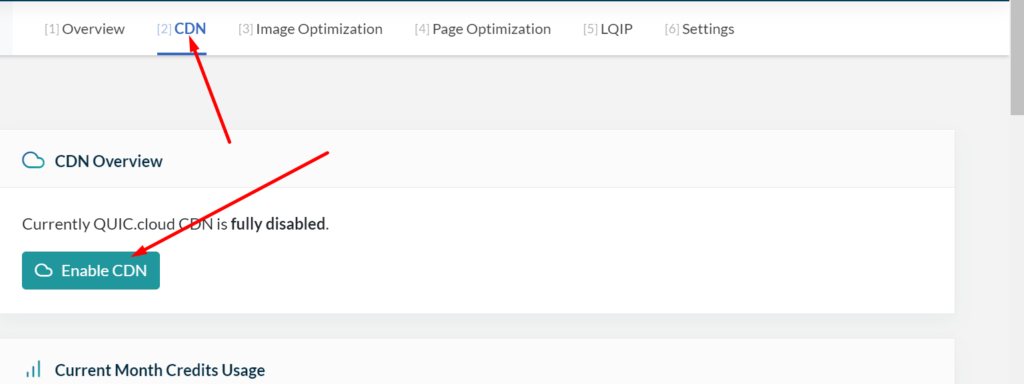
Enable QUIC.cloud CDN
- Click the domain for which you want to enable CDN
- You will be presented with a list of services for this domain
- Click CDN
- Click “Enable CDN”
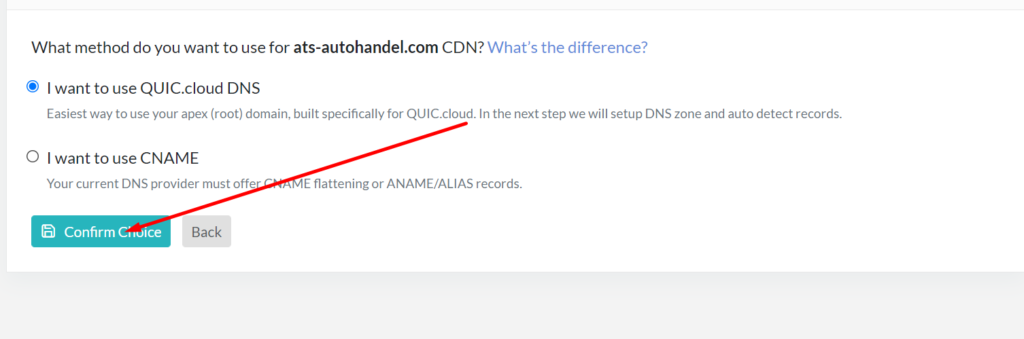
- Choose “I want to use QUIC.Cloud DNS” option
- Click confirm choice button
- You will see the QUIC.Cloud tool will scan your existing DNS records. This means QUIC.Cloud is creating a copy of all the DNS records from the zone file hosted at your current DNS provider.

- On the next screen you will see a list of all of those DNS records.
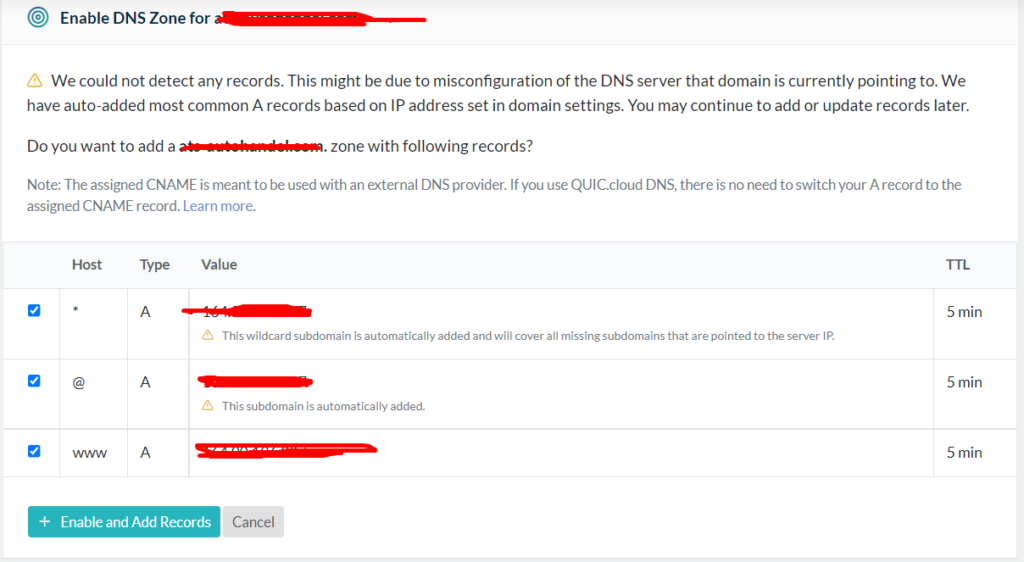
- Review the list of records and make sure that they are all there. When you are done, click the “+ enable and add records” button at the bottom to proceed.

- To complete the setup, you need to login to the domain register where the domain that you used in QUIC.Cloud CDN setup is registered and change the name servers on that domain to the ones which have been given to you by QUIC.Cloud here.
- Once you have made those name server changes, return to the browser tab where QUIC.Cloud is open and click the “refresh status” button
- QUIC.Cloud says that it can take up to 48 hours for their system to detect that you are using their name servers. However, it doesn’t always take that long
- You will know your name servers have updated when you see a check mark and the text “Using DNS” beneath the status column
- Your site is now using QUIC.Cloud CDN
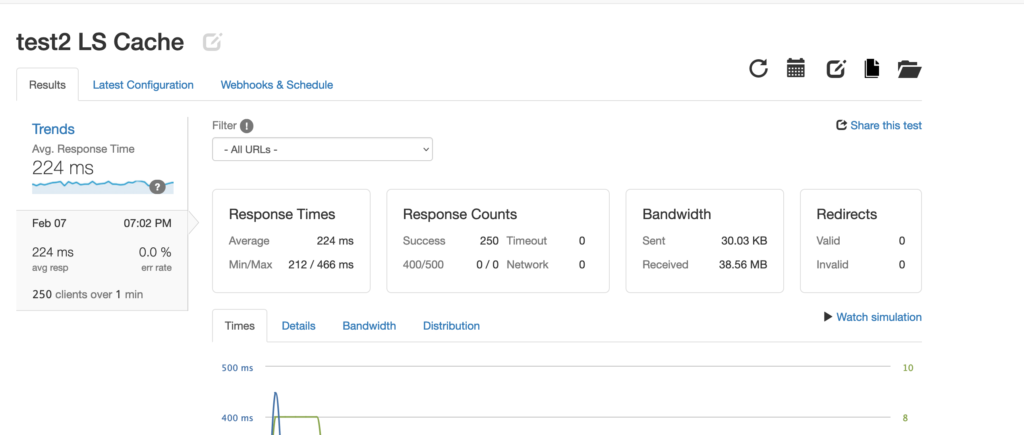
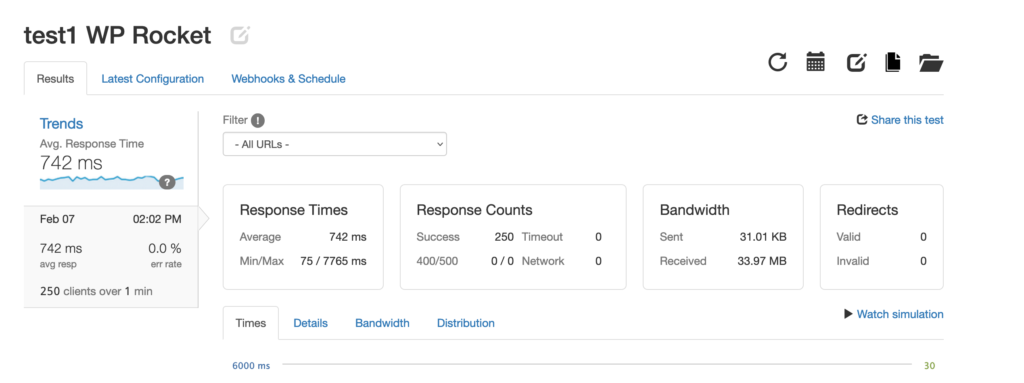
LSCache vs WPRocket: Loader.io Results with OceanWP WordPress Theme
LiteSpeed and LSCache generally tends to perform much better under high loads due to its ability to purge efficiently + server level caching. Below are results of Loader.io tests
You can also see these tests live on the video attached above.