
Table of Contents
LiteSpeed Cache WordPress Plugin
The speed of your website is very important as if your WordPress site loads slow, then it can turn some users away. Thankfully there’s an easy way to speed up your WordPress site using the amazing cache plugin called LiteSpeed Cache from LiteSpeed which is by far one of the best WordPress caching plugins on the market.
Here is my guide on what steps to follow in order to use LiteSpeed Cache and get maximum benefit out of it.
1. What is Speed Optimisation of a Website?
What is the speed optimization of a website? Not all websites are created equal, and you can tell that just by visiting some of them. Some load slowly. Yet if you look at a website’s statistics, 90% of all visitors expect a site to load in two seconds. Anything longer than that will probably result in the visitor changing the page.
This means that websites must be designed to work as fast as possible.
These factors are the first impassion of your website on visitors and also affect on SEO, site ranking, indexing etc.
2. Obstacles in Website Optimization.
Many website owners are not aware of the importance of a site’s speed optimization. This holds true especially if you run a small business or a startup company. Most people know that there are ways to speed up their sites, but there are obstacles. In fact, most of them don’t even know what the obstacles are.
1. Heavy CSS and JavaScript
WordPress is a free and open-source CMS and its user base is continuously growing. Often people use WordPress themes and plugins which are available in the market according to their choice and requirements. But the issue is when someone installs a WordPress themes it comes with lots of pages you may not require all of them thus you end up loading unused CSS and javascript.
CSS and JavaScript files are common issues with almost all ready-made themes.
2. Unoptimized images and media
Unoptimized images and media are one of the main reasons for a website’s low pages speed and page load. Most content writers copy-paste or create images for blogs and websites but they don’t optimize those. One of the main reasons for unoptimized images is the use of the wrong and heavy format.
Image optimization can be done before and after uploading images on WordPress. Like we can create an optimized image before uploading in the web compatible format and then upload or we can upload and optimize it using LiteSpeed cache. We will discuss this later in the post.
3. Too Many Widgets and Plugins
One common reason for unoptimized and low-speed websites is people don’t delete extra and unused plugins and widgets. Inactive and unused plugins put server side pressure and they also bring CSS and Javascript files which you don’t need.
Sometimes users install some plugins and then they forget to remove those, however, WordPress will keep loading all the files from the plugin making your site slow.
4. Bad server choice
Choice of Web hosting server is also very important and it also affects the performance of your website. If your server resources are not up to mark or server location is so far from the target audience this can also affect your website speed negatively.
Always try to get a server closer to your target audience and make sure it can handle the load depending upon your site traffic
5. Poor Coding Standards
Writing code in an efficient way is very important while building a website. And not every developer can write efficient code. Some developers write a lot of code to apply just a small function which makes the website slower and unoptimized.
So before doing any custom modifications make sure you follow good coding standards and don’t depend on external libraries as much as you can.
3. WordPress and LiteSpeed Cache.
WordPress is a free CMS and LiteSpeed cache is a WordPress Plugin.
3.1 WordPress
WordPress is a free and open-source website creation platform. WordPress is a content management system (CMS). Written in PHP and paired with MYSQL or MariaDB database. WordPress was originally created as a blog publishing system. WordPress is used by 41.4% of the top 10 million websites as of May 2021. According to the internet 455 million websites use WordPress.

3.2. LiteSpeed Cache
LiteSpeed Cache is a WordPress plugin. LiteSpeed is used to optimise WordPress site and increase its speed.
4. Deploy WordPress Website.
if you want to deploy a WordPress website on CloudPages follow these steps, if you already have a WordPress site, move to next step.
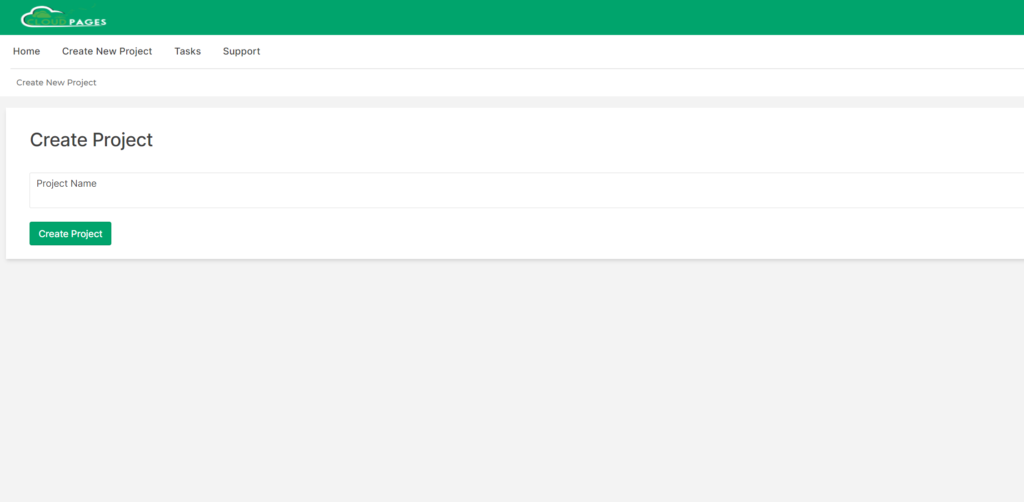
4.1 Create Project
If you want to create a website and deployed WordPress on CloudPages you must have a Project, if you don’t have any project on CoudPages follow the guide and create a project.
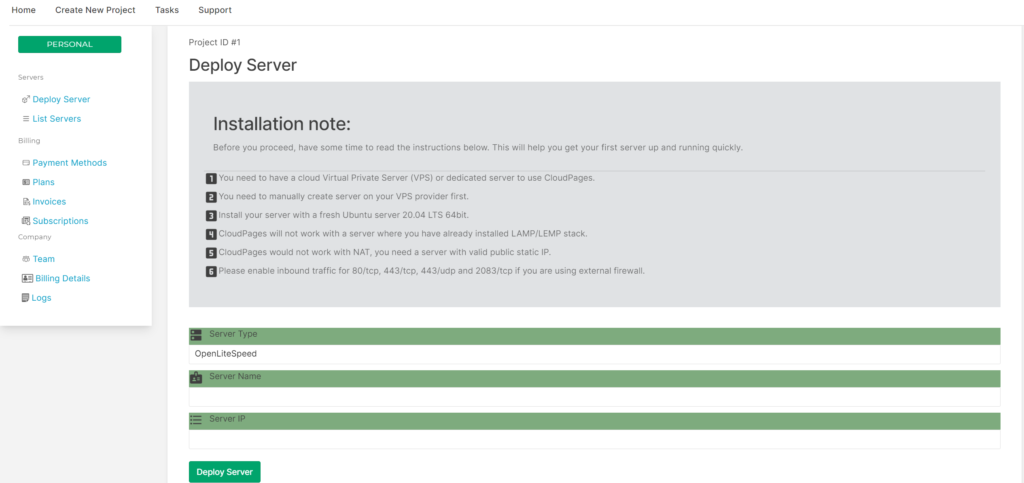
4.2 Deploy Server
Once the project is created, the next step is to deploy a server, if you don’t have any server on CloudPages follow this guide and deploy the server
4.3 Deploy WordPress
After Deploying the server, the next step is to deploy a WordPress site follow this guide for deploying WordPress on CoudPages.
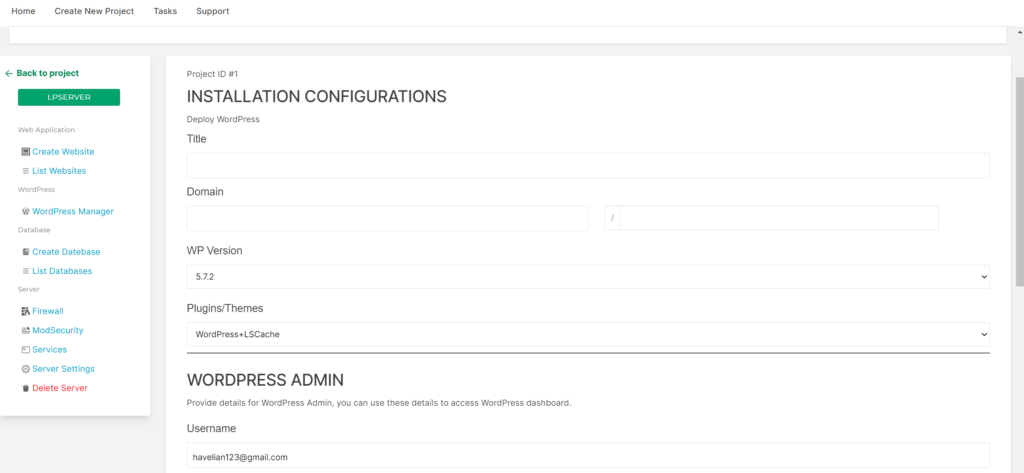
NOTE: Must choose WordPress + LSCache in the Plugins/Themes as this will automatically install the LSCache plugin during WordPress installation.
5. Pre Requisites
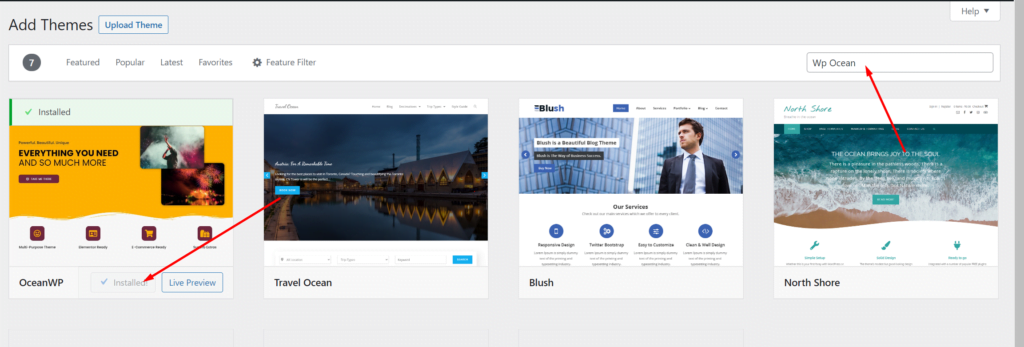
We will install WP Ocean theme before running any tests, because running test on plain WordPress installation does not do any justice. We will also install and E-Commerce demo so that we’ve a heavy site to run our tests on.
- Install WP Ocean Theme and required plugins.
To install the WP Ocean theme login to your WordPress admin dashboard then go to the Appearance ->Theme->Add New.

Now search WP Ocean in the search box and then press Install on next step press Activate to activate the theme.
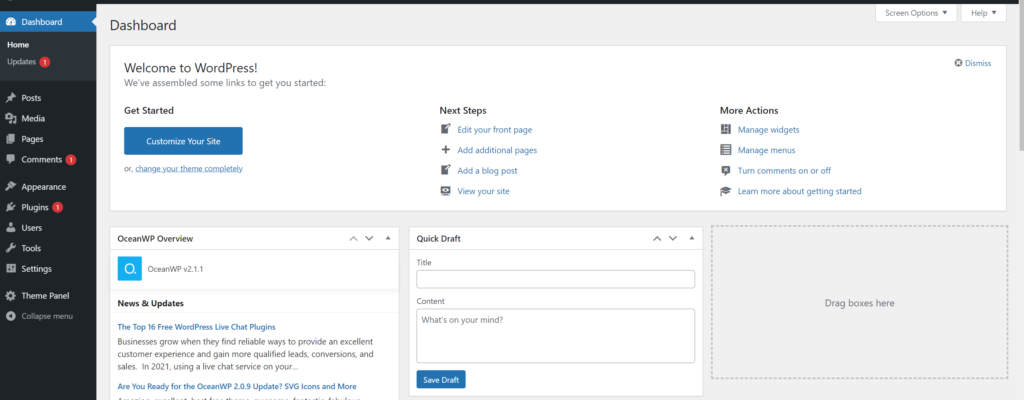
Before going to import any demo data first install and activate these plugins.

- Install any demo data for test.
Now install a demo on your site to do so follow few steps.
Go to the Theme Panel and then press Allow & Continue.

Now go to the Install Demo option and install any demo. We chose the e-commerce demo store and imported that into our website so we can perform tests with some data on-site.
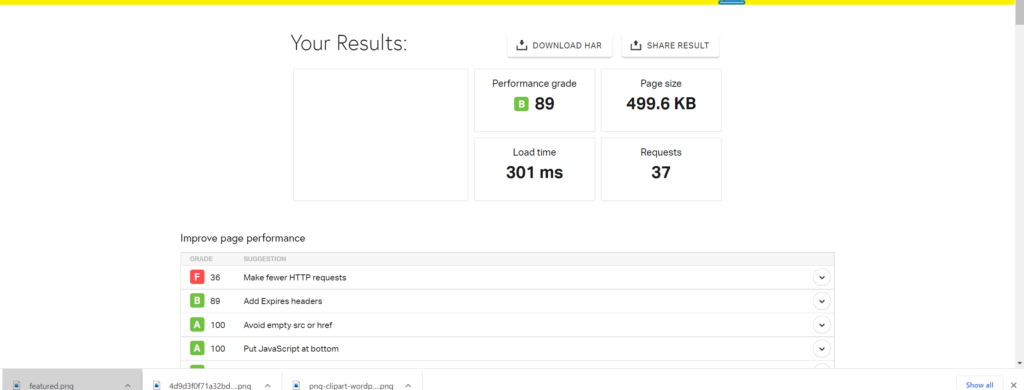
5. Performance without LiteSpeed Cache.
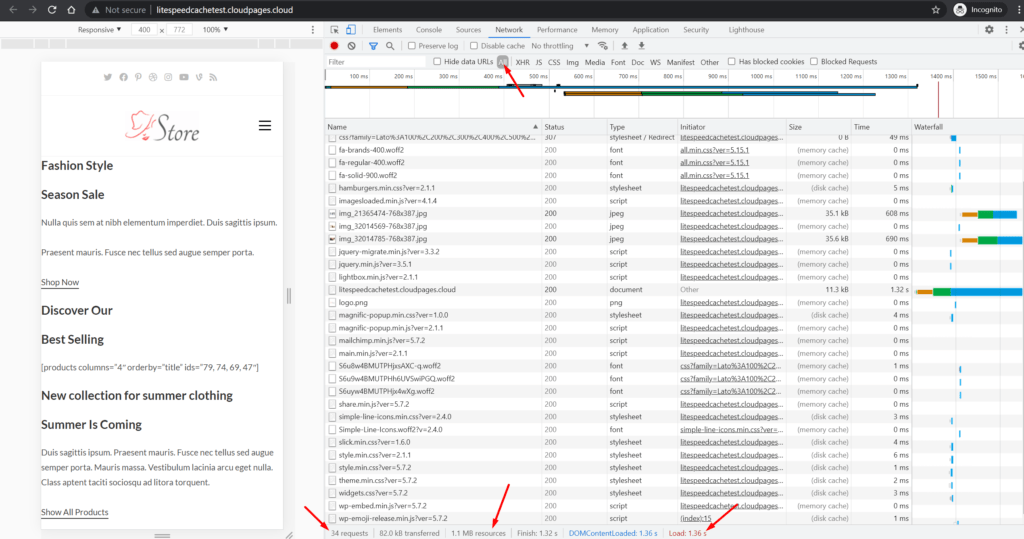
After importing demo data from WP Ocean first let’s check the performance of the website without LiteSpeed Cache and check all progress.
First make sure that there is no cache hit as we have disabled the LiteSpeed Cache.
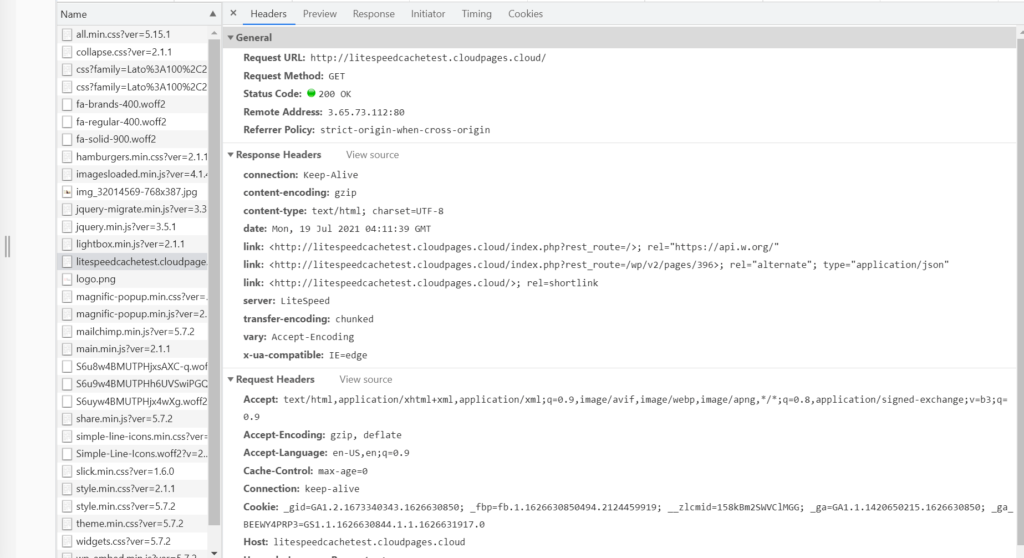
Performance From Google Chrome Console:
From Google Console (no optimisation applied)
- 34 total files
- 82.0 kB transferred
- 1.1 MB resources
- Finish: 1.32
- sDOMContentLoaded: 1.36 s
- load time 1.36s
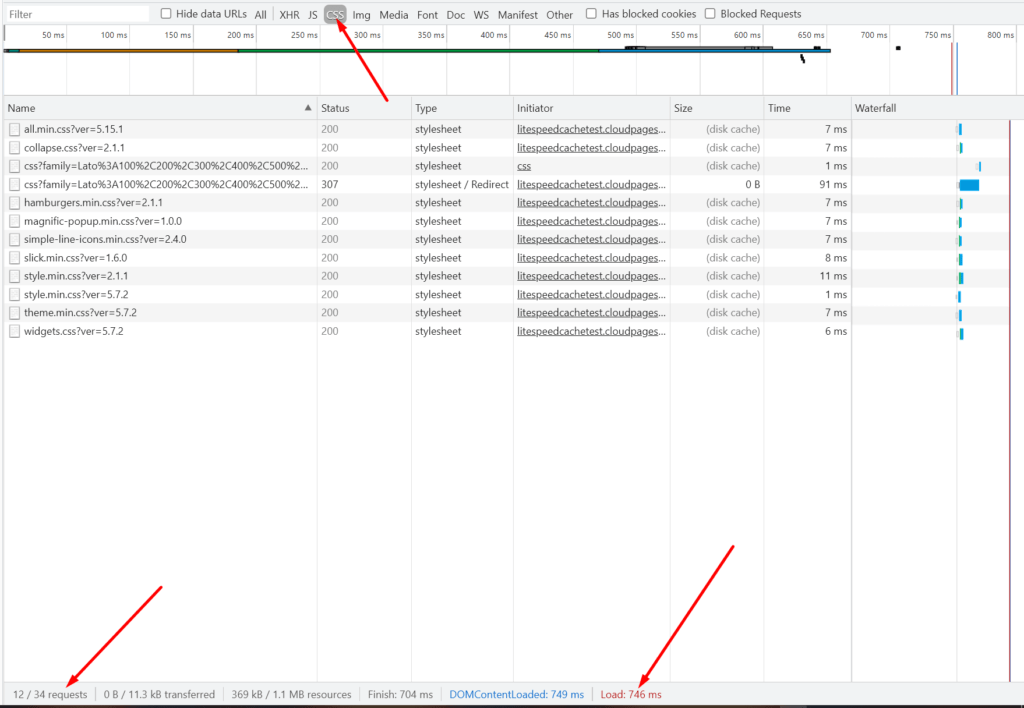
CSS Details:
- 12 / 34 files
- requests 0 B / 11.3 kB
- transferred 369 kB / 1.1 MB
- resourcesFinish: 704 ms
- DOMContentLoaded: 749 ms
- Load: 746 ms
JavaScript Details:
- 10 / 34 files
- requests 0 B / 11.3 kB
- transferred 269 kB / 1.1 MB
- resources Finish: 581
- msDOMContentLoaded: 480ms
- Load time 480

Performance from different page speed testing tools:
Let’s check the page speed of the demo site using different SpeedTest tools and we will rerun these tests after doing some optimization.
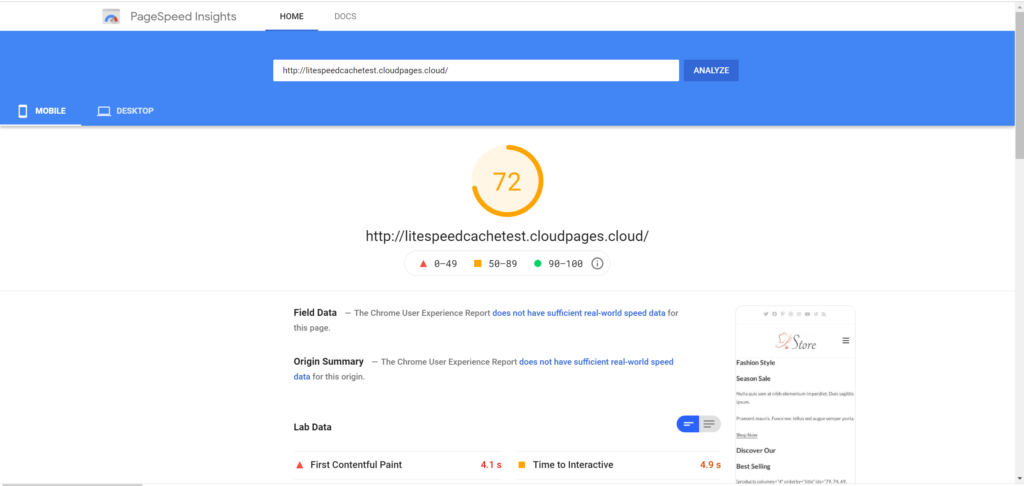
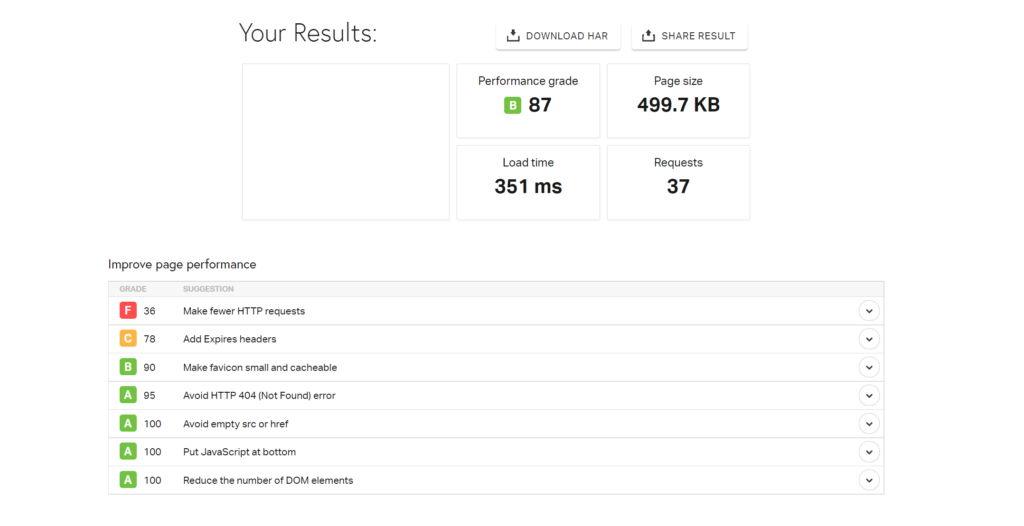
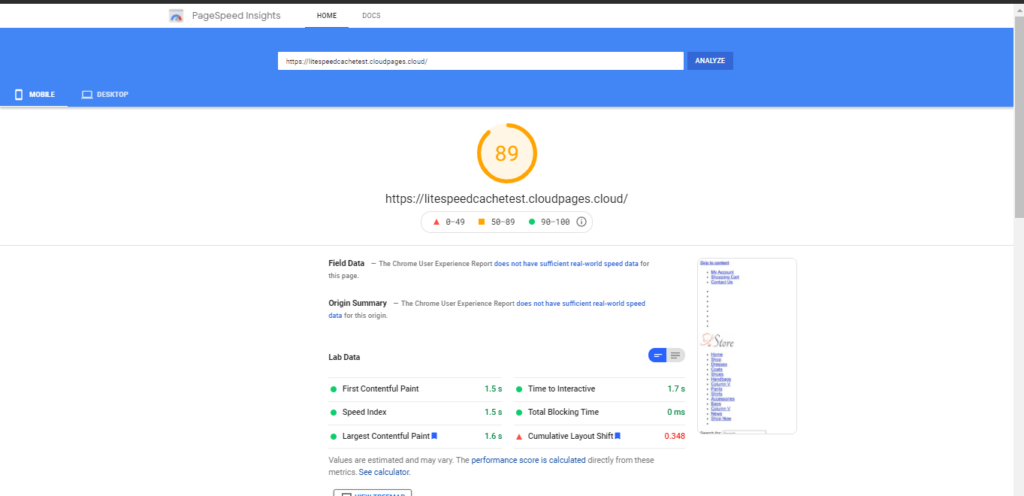
Google PageSpeed insight:
As the site does not have much data so the speed test results are not so bad. Also because of the fact that OceanWP is a good theme.
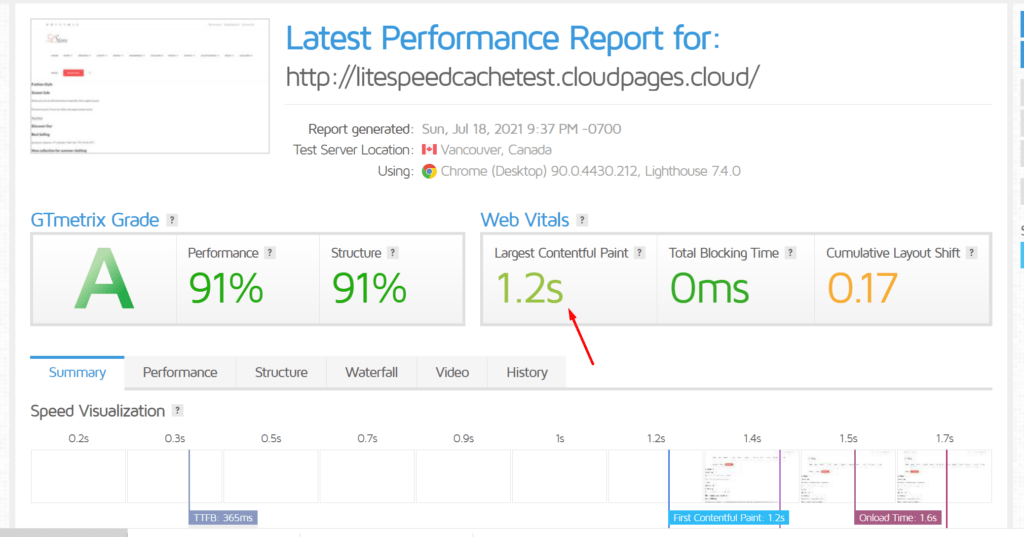
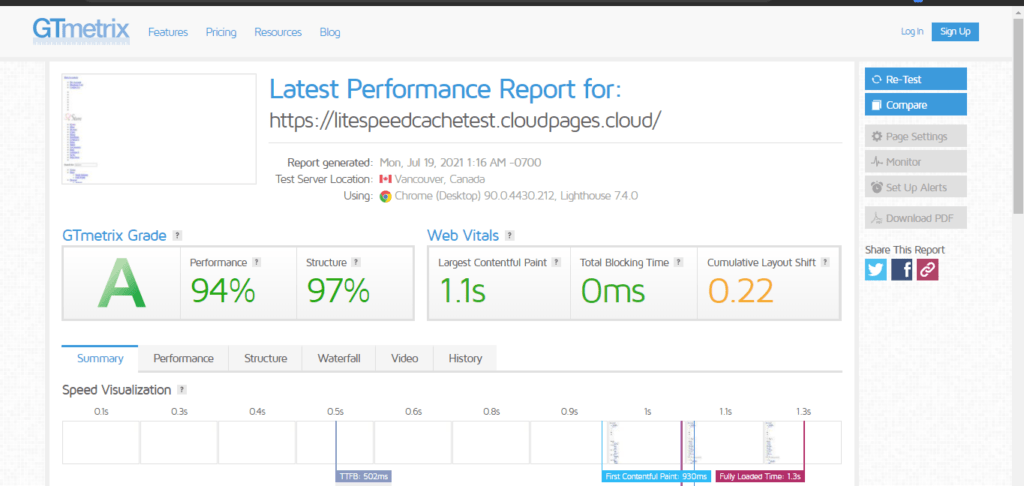
GT Metrix:
Speed test results are fine but we will check what is changed after enabling LSCache
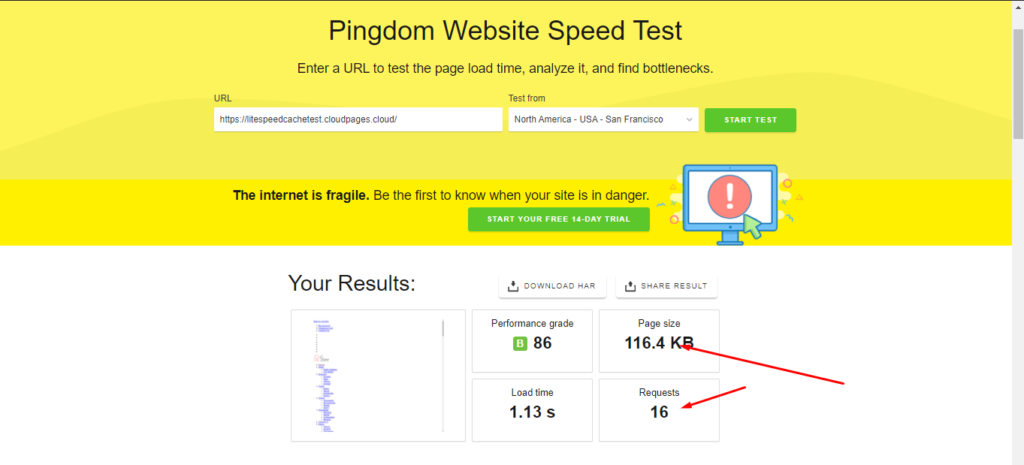
Pingdom Website Speed Test:
6. Performance with LiteSpeed Cache Default settings.
Now we will just enable LS Cache and and leave rest of the settings to default configurations:
After activating the Litespeed cache we can see cache hit.
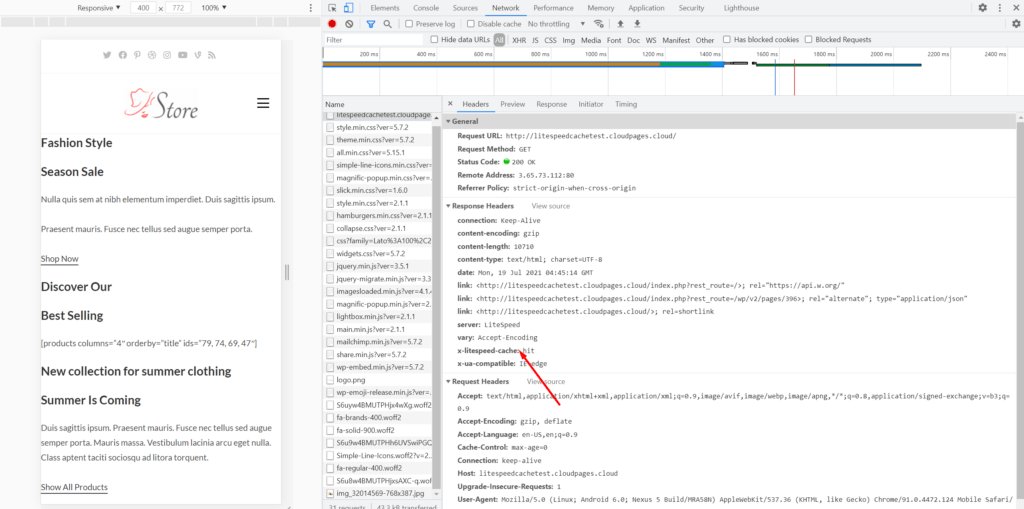
Performance From Google Chrome Console:
From google console with no cache for our test domain with demo data number stats are as follow:
- 31 files
- requests 11.3 kB
- transferred 1.0 MB
- resources Finish: 554
- msDOMContentLoaded: 633
- msLoad: 697 ms
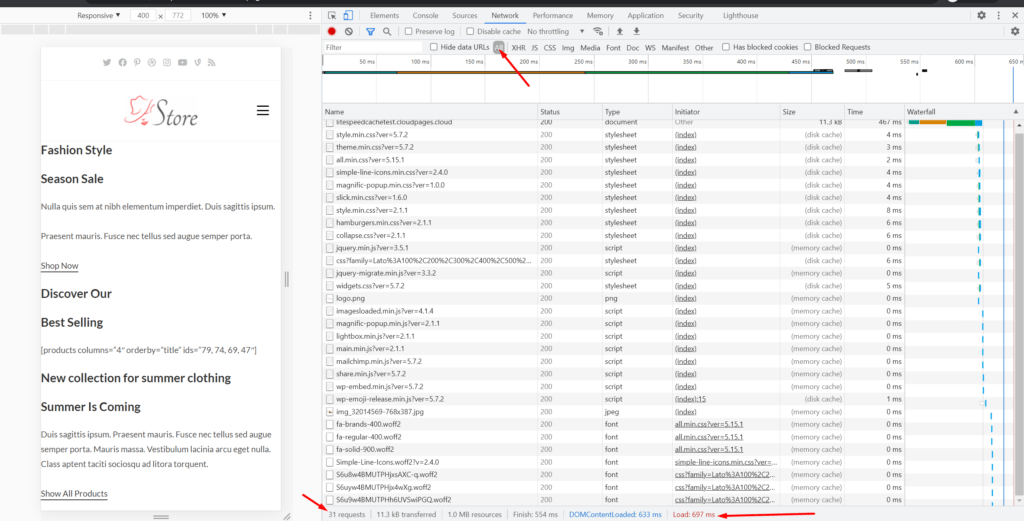
Results improved from our privious results because of cache hit.
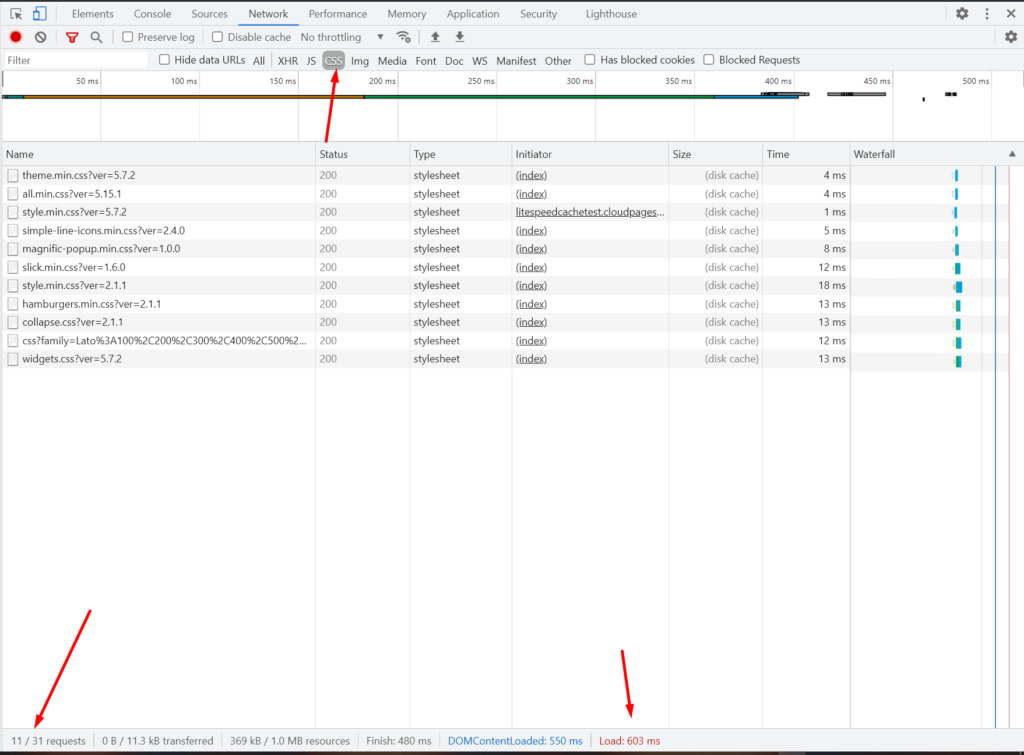
CSS Details:
- 11 / 31 requests
- 0 B / 11.3 kB transferred
- 369 kB / 1.0 MB resources
- Finish: 480
- msDOMContentLoaded: 550 ms
- Load: 603 ms
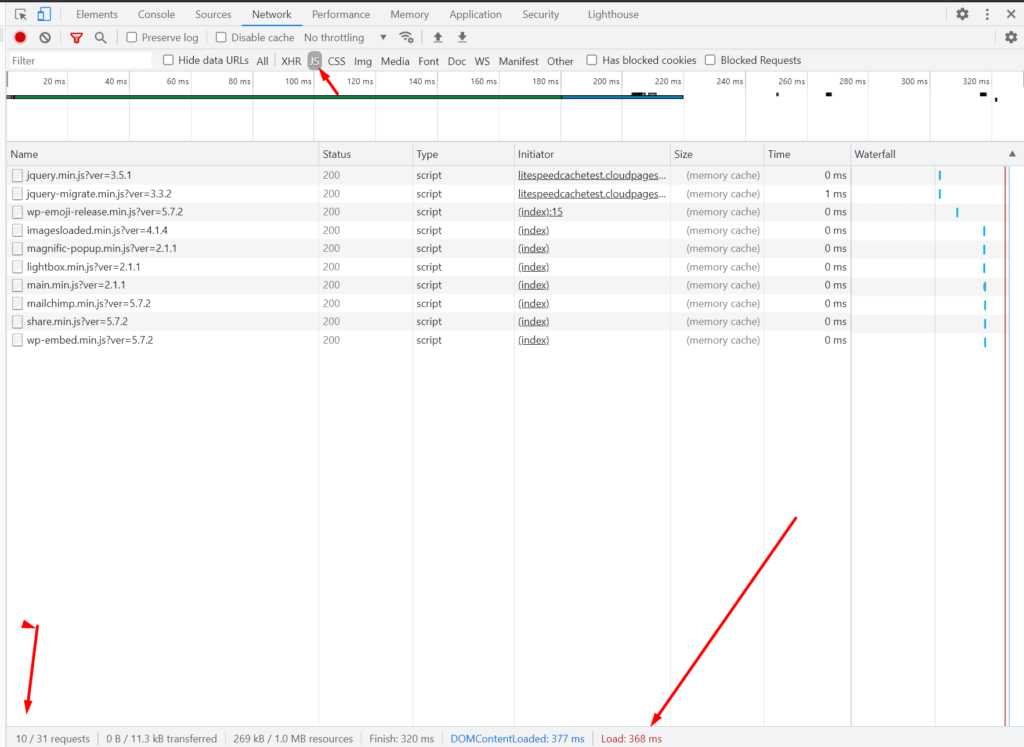
JS Details:
- 10 / 31 requests
- 0 B / 11.3 kB transferred
- 269 kB / 1.0 MB resources
- Finish: 320 ms
- DOMContentLoaded: 377 ms
- Load: 368 ms
Performance from different page speed testing tools:
Let’s check the page speed of the demo site using different SpeedTest tools to compare it with default configurations above.
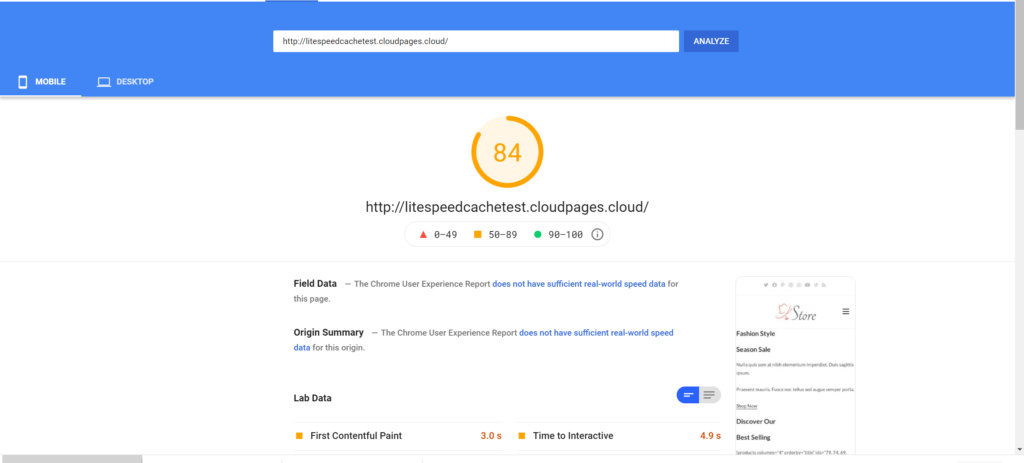
Google PageSpeed Insight:
Results are little improved by activating LS cache with default settings.
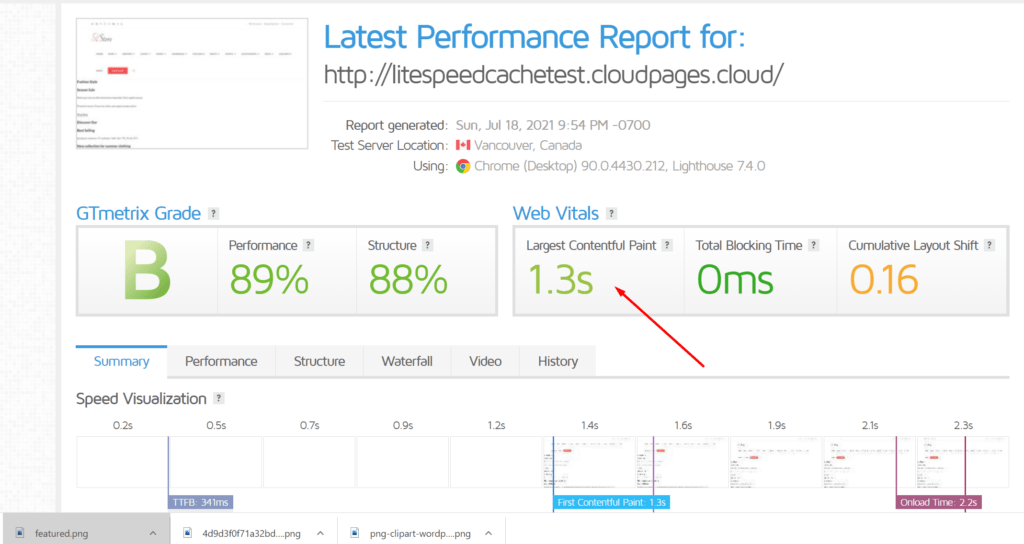
GT Metrix:
We can see screen content appears earlier compared to when there was a Cache-miss
Pingdom Website Speed Test:
Load time is decreased in this case.
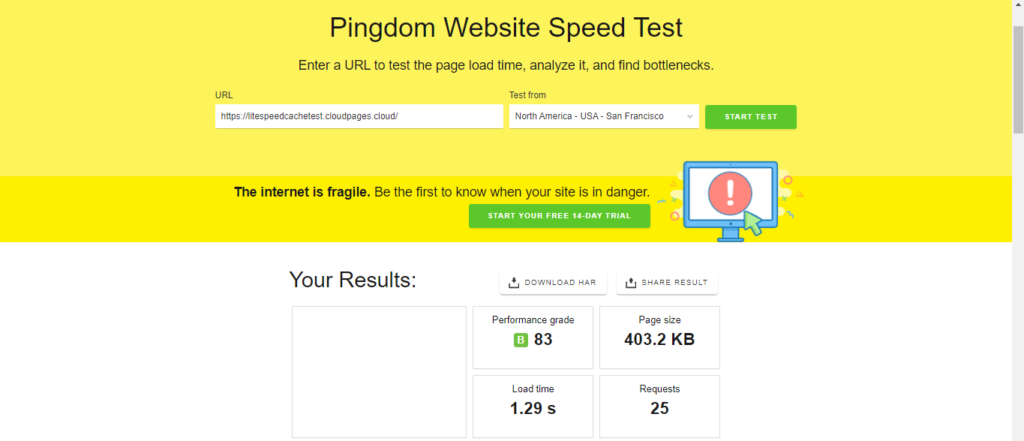
7. LiteSpeed Cache custom Optimization.
Now moving toward customization to increase page speed. Optimize your website using LiteSpeed Cache by minifying, combining CSS and Javascript. LiteSpeed Cache not only helps to Minify CSS and Javascript but also helps to set up object cache, browser cache, etc. Here we will go one by one and configure all the main options so that you can get maximum out of LSCache plugin
7.1 CSS Optimizations with LiteSpeed Cache and Performance Improvements.
To do CSS optimization go to the LiteSpeed Cache->Page Optimizations->CSS Settings.
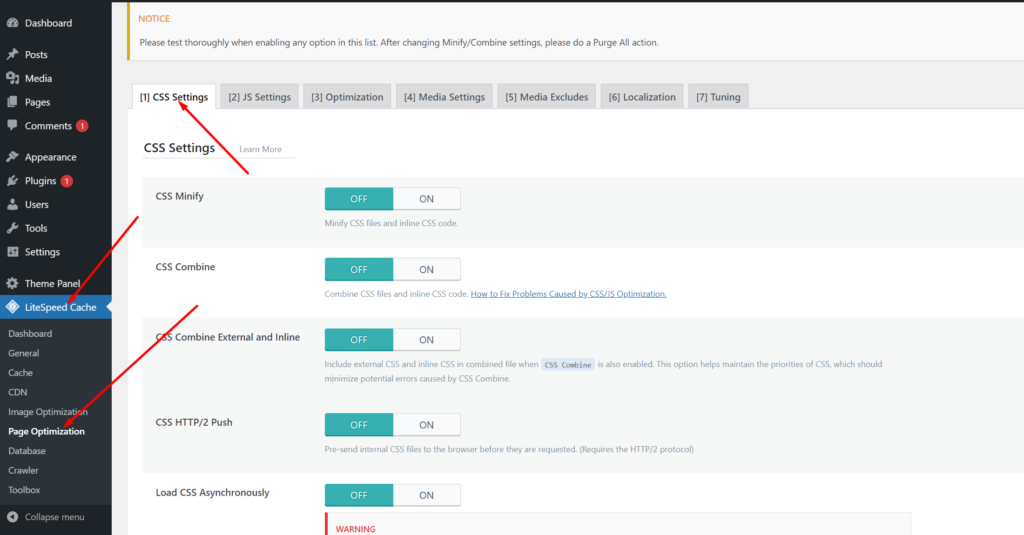
CSS Minify:
This will minify your CSS files and inline CSS. If you are not using any external CSS controller like Cloudflare etc you can turn it ON.
CSS Combine:
This will combine all of your CSS files. Turn it on and double check your website to make sure that your website design does not break.
CSS Combine External and Inline:
Include external CSS and inline CSS in a combined file when CSS is also enabled. This option helps maintain the priorities of CSS, which should minimize potential errors caused by CSS Combine. We will turn it ON.
Load CSS Asynchronously:
This may improve the score on speed test platforms but can cause issues with website initial display so keep it off mostly.
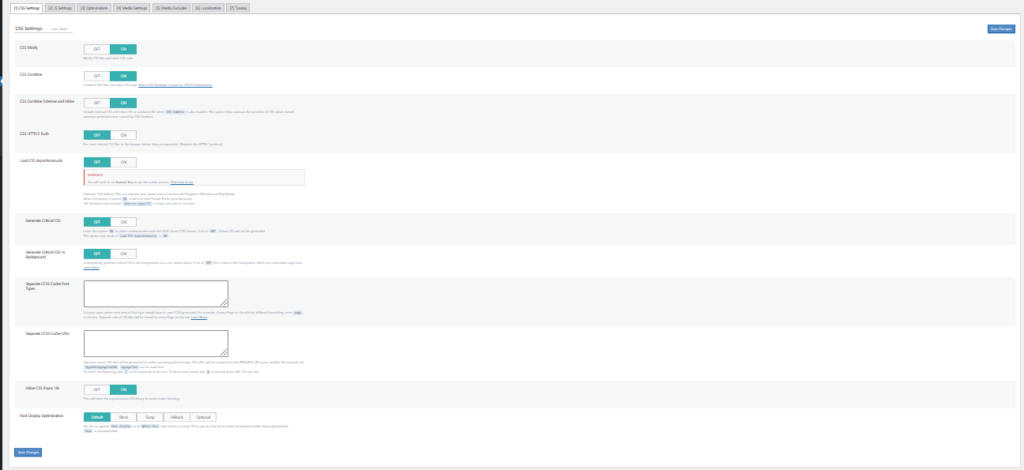
Generate Critical CSS:
Critical CSS will generate and load the required CSS before loading rest of the CSS. If you want to enable this option you need to throughly check your website to make sure nothing breaks. So we will keep this Off for now.
Generate Critical CSS In Background:
Automatically generate critical CSS in the background via a cron-based queue. Set it OFF for this article.
Separate CCSS Cache Post Types:
List-post types where each item of that type should have its own CCSS generated.
Optimized Settings for CSS:
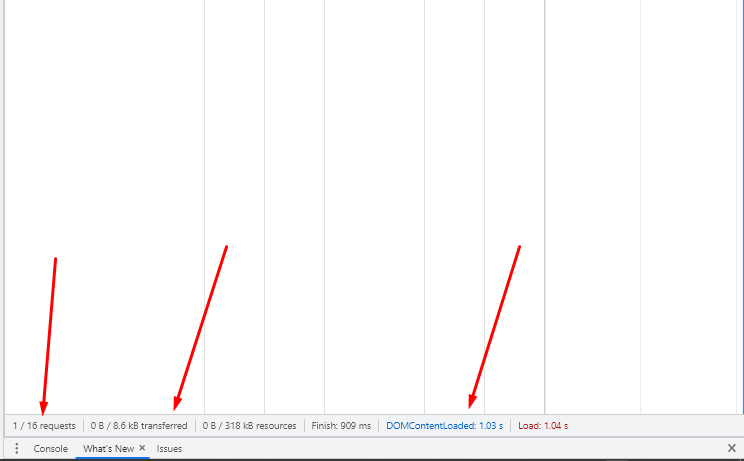
Performance on these settings:
Now CSS request is only one (because CSS files are minified and combined into one). The number of files decreased to 16 from 34.
- 1 / 16 requests
- 0 B / 8.6 kB transferred
- 0 B / 318 kB resources
- Finish: 1.04
- sDOMContentLoaded: 1.13 s
- Load: 1.27 s
Google Page Speed:
GT Matrix:
Pingdom Website Speed Test:
Hence the performance affected by CSS is now improved.
7.2 JavaScript Optimizations with LiteSpeed Cache and Performance.
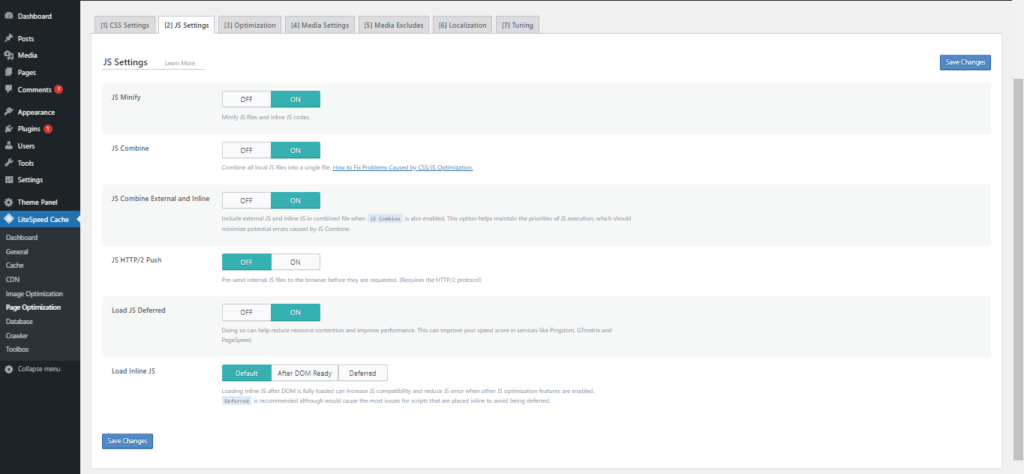
To do JavaScript optimization go to the LiteSpeed Cache->Page Optimizations->JS Settings.
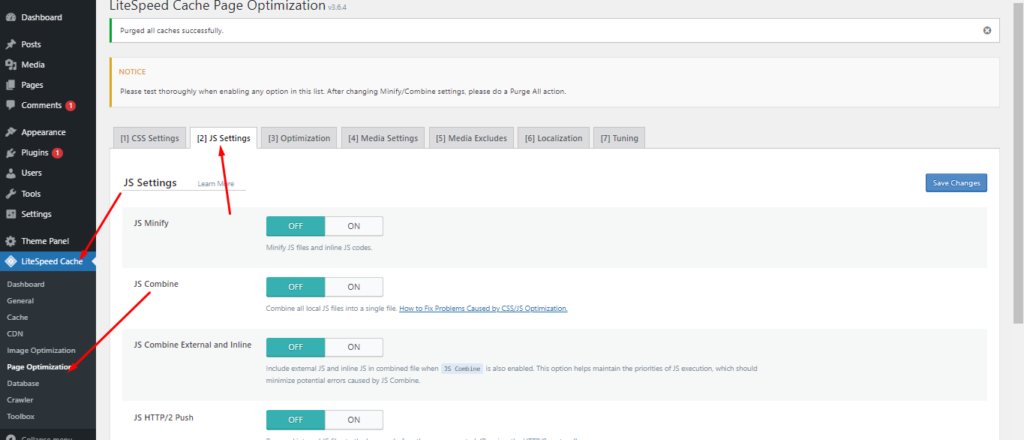
JavaScript Minify:
This will minify your JavaScript files and inline JavaScript. If you are not using any external JS controller like Cloudflare etc you can turn it ON.
JavaScript Combine:
This will combine all of your JavaScript files and inline JavaScript code. Turn it on if it does not break your website style. For this, we made it ON.
JavaScript HTTP/2 Push:
Pre-send internal JavaScript files to the browser before they are requested. (Requires the HTTP/2 protocol).
Load JavaScript Deferred:
Doing so can help reduce resource contention and improve performance. This can improve your speed score in services like Pingdom, GTmetrix, and PageSpeed. We will keep it ON but only do it once it does not affect your JavaScript functionality.
Load Inline JavaScript:
Keep it default.
Optimized JavaScript settings:
Performance on these settings:
Now there are only 2 JavaScript files being requsted from server (because JavaScript files are minified and combined into two files).
- 2 / 29 requests
- 0 B / 9.5 kB transferred
- 89.5 kB / 824 kB resources
- Finish: 1.23
- sDOMContentLoaded: 1.24 s
- Load: 1.24 s
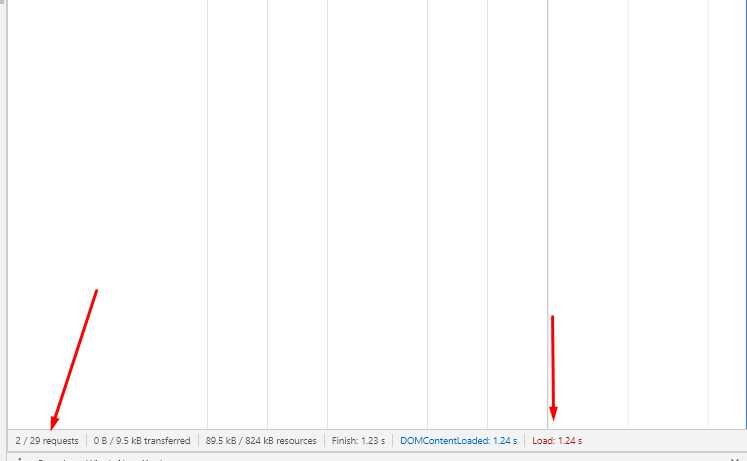
Note: Only JavaScript is optimized in this section.
Google Page Speed:
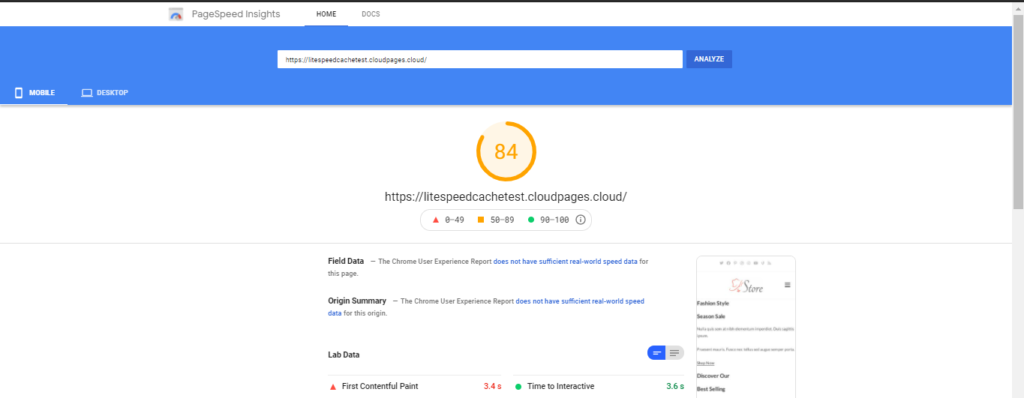
GT Matrix:
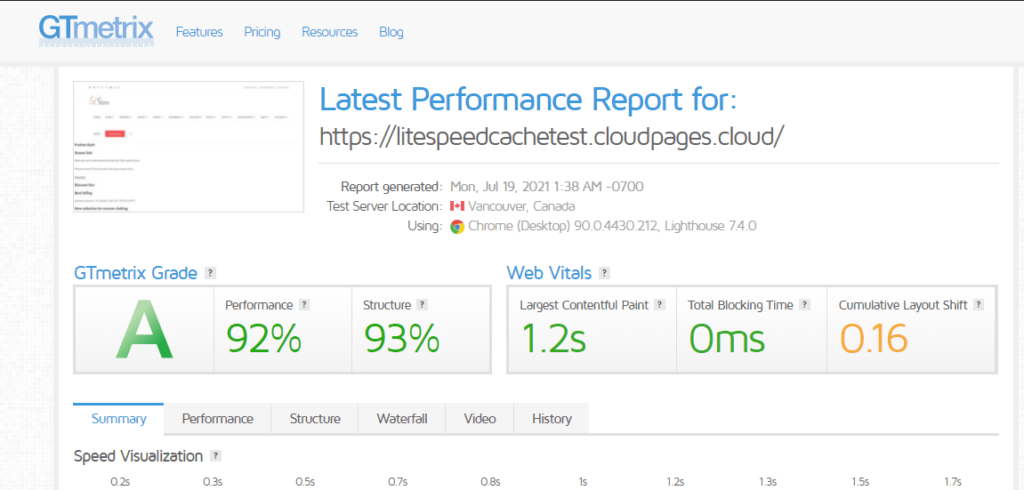
Pingdom Website Speed Test:
7.3 Image Optimizations with LitSpeed Cache and Performance.
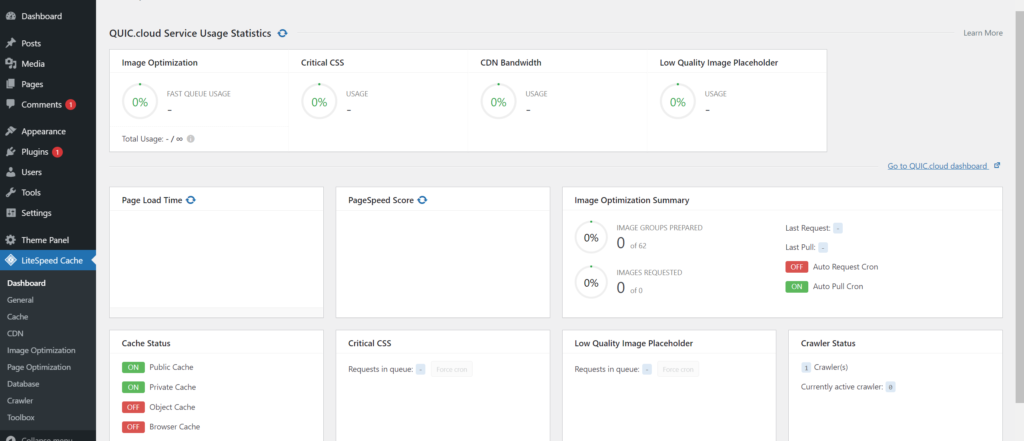
LiteSpeed Cache also allows you to optimize images of your website. To do image optimization go to the LiteSpeed Cache-> Image Optimization-> Gather Image Data.
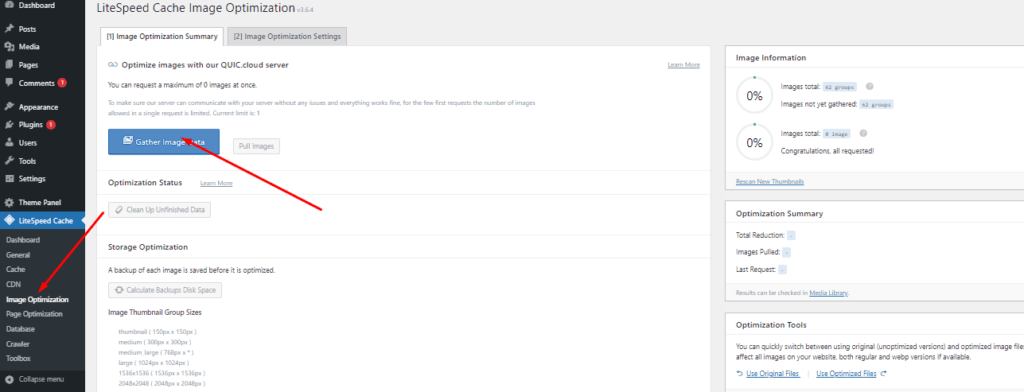
To optimize the image click on this button and optimization will start. You can see the progress in the sidebar of this screen.
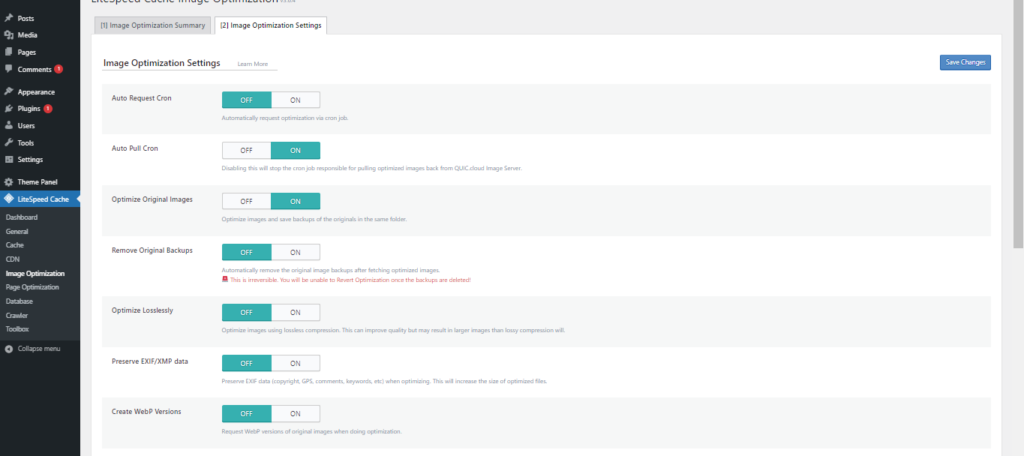
If you want to do any settings for image optimization click on Image Optimization Settings.
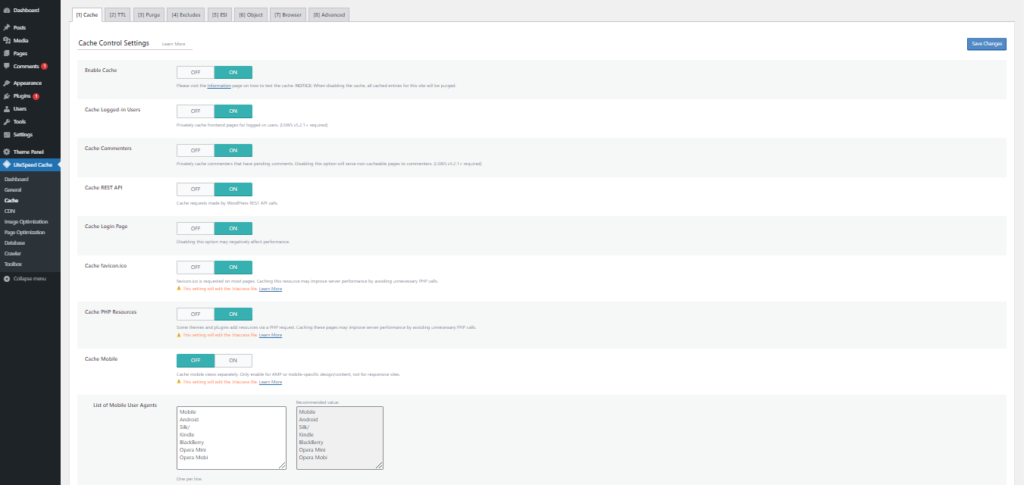
7.4 Cache setup with LiteSpeed Cache and Performance.
LiteSpeed cache allows using of different types of caches. To enable cache go to the LiteSpeed Cache->Cache.
You will see lots of options like Cache, TTL, purge, Exclude, ESI, Object, Browser, Advanced.

1- Cache:
- Enable LiteSpeed Cache (Keep it on so cache will work, this is default page-caching of LSCache)
- Cache Logged-in Users (Cache pages for logged in users)
- Cache Login Page (You can keep it on, because login page won’t change much)
- Cache favicon.ico (Keep it ON to load favicon from cache)
- Cache PHP Resources (A must have)
- Cache Mobile (If you have different theme for phone keep it ON)
- Drop Query String (Either to drop query strings from URLs and create a single cache copy)
TTL:
Keep all values default and change if you are an expert user.
Purge:
Purge All On Upgrade:
Keep it on. And keep others as default.
Excludes:
Add anything accordingly if you want to exclude anything from getting cached.
Object Cache:
Enable Redis Cache, this will help reduce load on your database.
Browser Cache:
Browser caching stores static files locally in the user’s browser. Turn this setting to ON to reduce repeated requests for static files.
8. Benefits of high PageSpeed.
Page Speed is one of the factors that search engines consider when evaluating your website’s score. A fast website is a happy website. Google mandates that PageSpeed is an important part of their ranking algorithm. On top of that, users have taken note of how long it takes for sites to load. PageSpeed affects:
- Search Engine Ranking of the website.
- User Experience
- Conversion rate