
Adding widgets to WordPress enables you to perform application actions. They allow you to enhance your interactions with apps and add certain app features. You can add widgets on a wide range of areas on your WordPress site. For instance, you may add a clock or counters as widgets.
There are tons of widgets that you can download and add to your website. WordPress allows you to customize thousands of widgets by adding your custom code. The process is easy if you understand how to use WordPress tools. Here are important steps to help you create custom WordPress widgets.

Image Credit: Pexels
Table of Contents
Learn the basics
Custom widgets in WordPress require you to understand the basics. WordPress offers you a variety of tools to help you customize hundreds of widgets. You need to spend time and learn how to use the tools. The process might seem tough for you at first. What you need is consistent practice to make it work.
Widgets allow you to customize your website for a better user experience. You can add them to your computer to help you access a variety of tools fast. You may add widgets for MacBook such as color, screen saver, or a clock. How to use widgets depends on the goal you want to achieve. You can create shortcuts for quick access to the widget anytime. To get the best experience, you need to configure your Mac desktop widgets settings properly. You can download widgets for Mac desktop or customize them. You can get the right information about how to add desktop widgets online.
You also need to learn the PHP basics to help you create a widget. You may choose to use pre-created widgets and customize them. You may also decide to create them from scratch. In this case, you need to allow yourself enough time to harness the skills. Once you learn the basics, it is easy to get started with the process.
Take precautions
Before you create a WordPress widget, you first need to take precautions. It’s all about ensuring your site is safe just in case you miss the steps and cause errors. The precautions you may take might include the following:
● Create your data backups. If you miss a step and create the wrong code, you might lose your entire data. Create a backup in the cloud to boost your safety.
● Test every step. Avoid publishing before you’ve tested. Once you publish, you will make the widget available to the public. Ensure you are publishing something that will improve the experience of your visitors.
● Use the simple method until you get the skills. Use simple tools to help you gain skills. Once you gain them, use the complex tools with greater confidence.
Create a WordPress widget class extension
Use the Text Editor tools to create the WP widget class extension. The new class extends the widget class. Use the following code line to create the extension.
Class [types your widget name] extends WP_widget {
Once you type the widget name, the code should change and display the name you have typed. It can read something like the name below.
siteclock_ extends WP_widget {
Open the Constructor Function to add your widget parameters
The purpose of the Constructor Function is to help you add your widget’s parameters. It is easy to understand how to add a widget and its parameters.
Once you open the Constructor, you will get a chance to add details to your widget. The details could include the name and how you describe the feature. Here are the steps.
The basic code could appear as follows:
function_construct() {
If you add the details, it can appear as:
primary::_construct ( // WIDGET NUMBER
‘siteclock_ widget’,
//WIDGET NAME
_(‘siteclock widget’, ‘siteclock_widget_domain’),
//WIDGET DESCRIPTION
primary( ‘description’ =˃ _( ‘Sample widget based for custom site clock’, ‘siteclock_widget’ ), )
);
}
Image Credit: Pexels
Create the front-end
Once you complete the widget parameter section, the next step on how to add widgets to WordPress is to create the front end. Use the Widget Function to achieve this goal. This is the end that is displayed on your website. The details displayed depend on the goal of the widget. It may look like this.
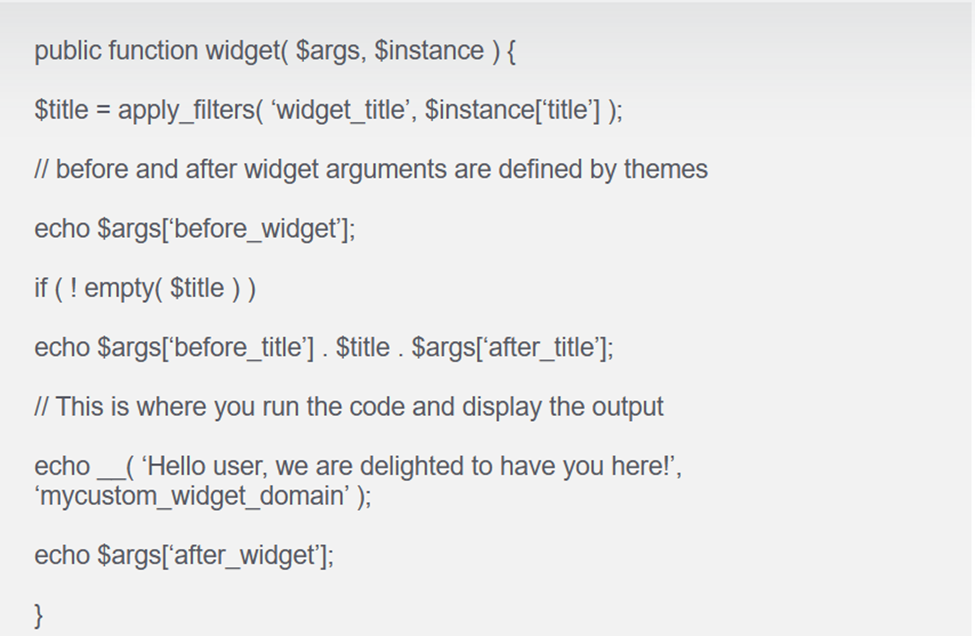
Figure 1-source- bloggingtips
Create the back end
The back end features the widget controls. It is the administrator’s control end. It should look something like this.
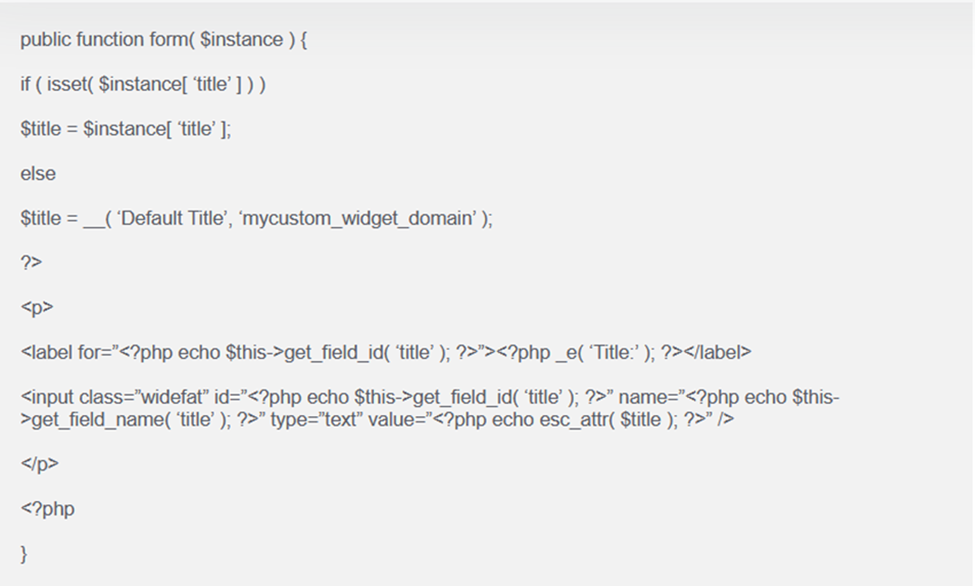
Figure 2-source – bloggingtips
Publish the widget
The final step should be to publish the widget. The publishing/registration command should look something like this.

Figure 3-source – developer.wordpress.org
Conclusion
WordPress widgets help developers add features to their sites. They can be added to different places on the site depending on their use. They may include forms, clocks, or welcome notes. It is easy to create a widget but you need to learn the basics. Before you get started, create a backup for your data.